
Are you looking for a plugin that can prevent your contact forms from getting spam submissions?
Spam submissions have been a huge problem for bloggers, especially automated spam that comes from bots. However, with WPForms, you can build spam-free contact forms that can bring down the risks of receiving fake or spam orders.
WPForms is one of the most powerful contact form plugins that eliminate spam submission and can work with or without using the CAPTCHA. In this article, I’m going to show you a step-by-step guide on how to add reCAPTCHA to your WordPress contact forms to prevent getting spam form submissions.
How to Create a Spam-Free Contact Forms Using reCAPTCHA
Before proceeding to the detailed steps, it’s important to understand what is reCAPTCHA and why it is important for our website.
reCAPTCHA is a CAPTCHA-like service that helps protect websites from spam and abuse. It’s a free service from Google that uses advanced techniques to keep humans and bots apart.

Some of the major benefits of using the CAPTCHA are:
- Block all automated spam by verifying that a human is submitting the form.
- Make form submission more secure and can help reduce form abandonment.
Recently, Google has introduced its improved version of the CAPTCHA tool i.e. reCAPTCHA v3 which is more easy to use. With this tool, the users have to just click on the checkbox instead of entering text and the tool identifies that this is not an automated spammy bot.
Now, let’s learn how to add reCAPTCHA checkbox to your contact forms:
Step 1: Create a New Contact Form in WordPress
To get started, you’ll need to install and activate the WPForms plugin on your WordPress website.
Now, you’ll need to create a contact form on your website. For this, go to WPForms >> Add New in your WordPress dashboard area and select the “Simple Contact Form” template.

Clicking the Simple Contact Form box will bring you to the next window:

Here, you can simply drag and drop any form fields according to the data you want to collect from your users.
Once you have added the required fields, click on the “Save” button at the top right.
Step 2: Configure reCAPTCHA Settings
Next, you need to configure the reCAPTCHA settings on your website.
For this, head over to WPForms >> Settings and click on the reCAPTCHA tab. Then, select reCAPTCHA v2 checkbox to add an interactive reCAPTCHA box to your contact form.

Next, you’ll need to enter site key and secret key to use reCAPTCHA that you can easily generate by visiting Google’s reCAPTCHA setup page which is a free service provided by Google.
After, clicking on the link, you’ll be redirected to the setup page. Here, click on the Admin Console button and sign in to your Google account.

After signing in, you’ll be redirected to a registration page where you can register your website for reCAPTCHA. In case, if you’ve already registered your website, you’ll see a different screen.
For registration, enter your website name in the label field. You can use another name too that will make it easy for you to identify the site in the future.

Next, select the type of reCAPTCHA you want to add to your website. Here, we’ll choose reCAPTCHA v2 and then click on “I’m not a robot” checkbox.
 After filling all the required details, click on the Submit button to save your site.

Once submitted, you’ll see a site key and secret key for your website.

Copy both keys from this page and paste them to WPForms >> Settings page.

Now, click on the Save Settings to activate reCAPTCHA on your website.
Step 3: Add reCAPTCHA to Your Contact Form
After adding the keys successfully, now it’s time to add reCAPTCHA to your WordPress form. To do this, go to Settings » General in the form editor.
At the bottom, check the box next to Enable Google Checkbox v2 reCAPTCHA.
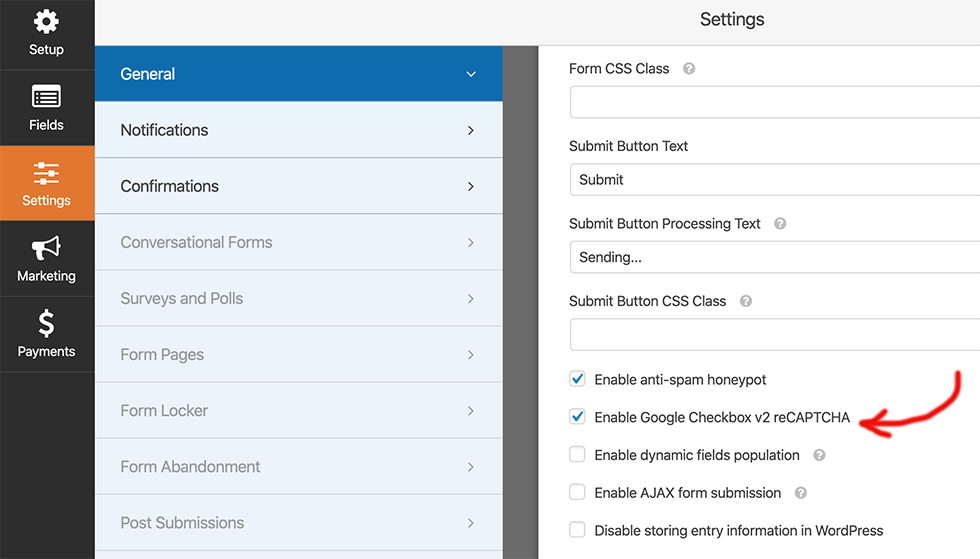
Click on the Save button to store your changes.
Step 4: Add and Publish Contact Form with reCAPTCHA
The next and final step is to add your form to your WordPress website.
For this, go to Page >>Add New to create a new page.
Now, name the page as Contact Form or anything you’d like to write about.
If you using the Gutenberg editor, click Add Block (+) icon and type WPForms in the search bar and select it. Or click on Add forms and select contact form in case of the Classic editor.

Next, select a form from the dropdown box that you want to add to your page.

Now, hit the publish button so your form will appear on your website.
Isn’t so simple. 🙂

Final Words
After reading this article, now you may have a clear idea of how to build spam-free contact forms using the WPForm plugin. So, start using this amazing plugin now and protect your website’s contact form submissions from automated spambots. Also learn, how to fix email related issues using WPForms.
If you have any questions or suggestions about this tutorial, let us know in the comment section below.

